There’s no game like Dragon Ball FighterZ that managed to “translate” the high-octane action of Dragon Ball into a full-fledged fighting game. Compared to the open spaces of most 3D Dragon Ball titles, Dragon Ball FighterZ is all about speed, technique, and good ol’ fashioned Dragon Ball transformations.

12 Strongest God-Tier Dragon Ball Super Characters, Ranked
The strongest characters in Dragon Ball Super aren’t just God-Tier, they’re now literal gods thanks to their staggering Power Levels.
While the game has met its fair share of ridiculous characters, such as Ultra Instinct Goku, what’s even more interesting is its continuously evolving meta. In a game that can make the likes of Yamcha have an interesting moveset, the most powerful Dragon Ball FighterZ characters in 2026 also bring in the heat in some of the most unique ways.
10
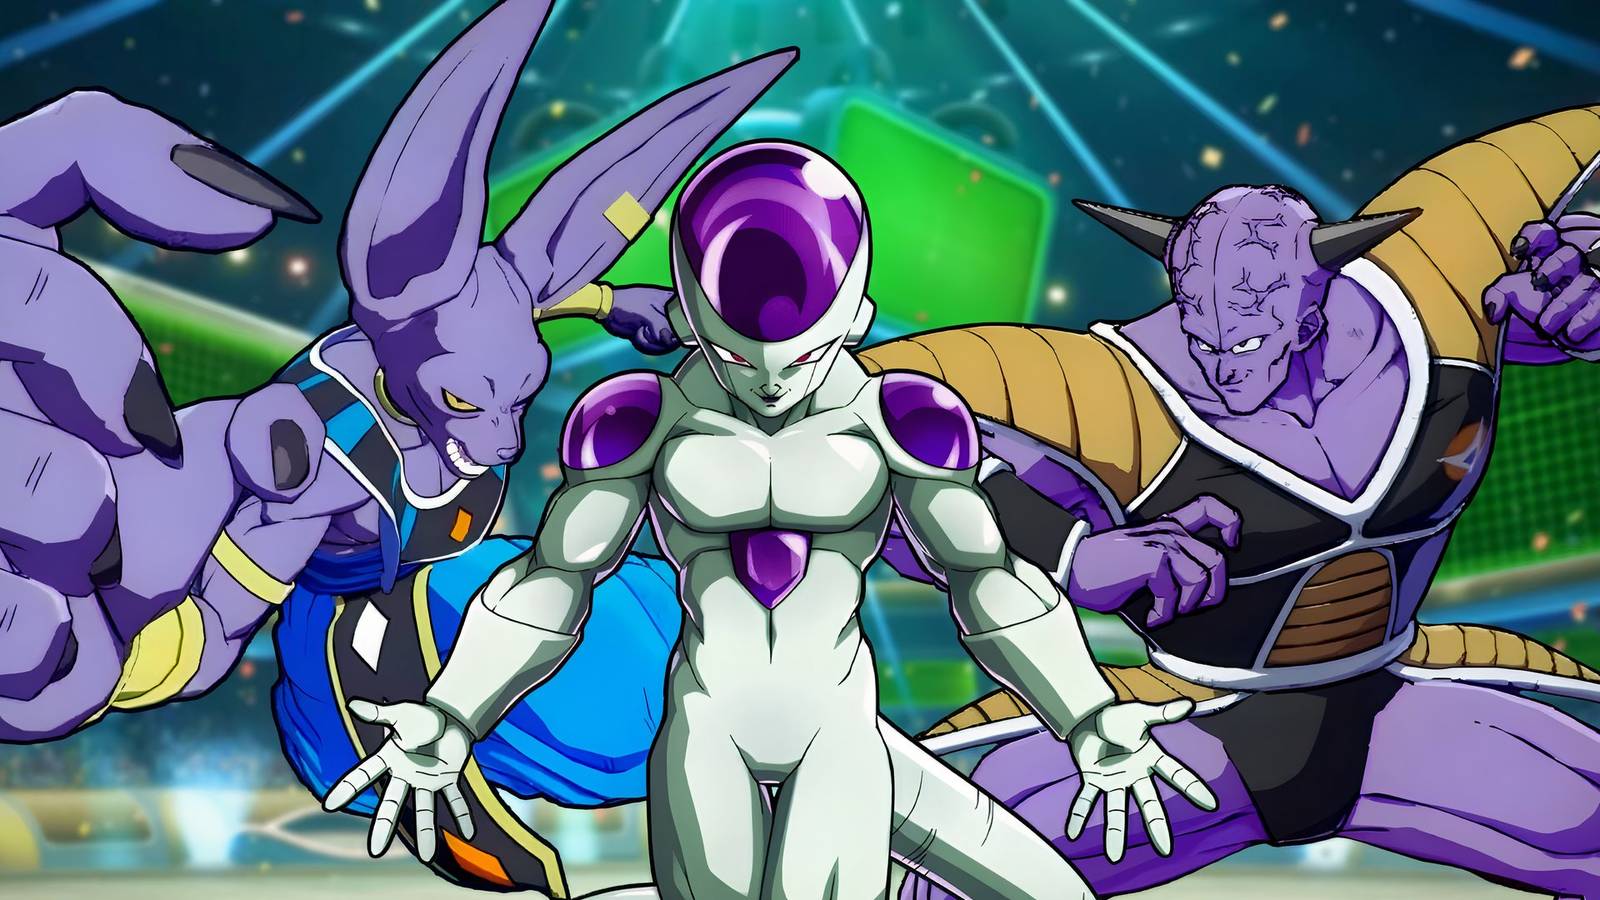
Captain Ginyu
Call The Ginyu Force To Explore Pressure Game
- Ginyu Force via 5S, 236S, or 214S can be used to call various Ginyu Force members for combos.
- Ideal Ginyu Force order is Guldo to Recoome to Burter to Jeice – this rotation can potentially lead to high damage numbers.
- Body Change is not as useful unless it’s against an opponent with a moveset the players know well.
Gamers actually looked down on Captain Ginyu in his first outing – why even bother learning a character from an obvious Super Sentai gag, right? With an underperforming kit and a lack of pressure game, Ginyu won’t last against the higher end of the food chain. That is, until players hate-played him into the meta and realized Ginyu’s best strengths are in his Assist game: Ginyu Force summons (5S, j.S, 236S, 214S).
Ginyu can output some of the game’s largest damage numbers with the Force, assuming correct deployment. Guldo always sets up a projectile (Ki Blast invincibility) that may go into a Recoome beam, a knee-rush (for screen coverage), and a charge-with-explosion (for huge hitstun and combo scaling). Burter then jumps in with either a teleport-kick barrage, an anti-air, or a counter-corner warp. Lastly, Jeice teams up with Burter with an all-around Ki-Blast barrage or a downwards Ki-Blast (juggle setup). While his Body Change (trade health bars and movesets) is a decent comeback mechanic, it’s not advisable unless the enemy is a character players know how to use. If not, they’re better off spamming the Force to secure the win – it’s the only way Ginyu can build proper momentum in a match.
Forgot the next Ginyu Force member to call? Use the sound cue – each Force member has a unique one when summoned!
9
Super Saiyan Blue Gogeta
Combo Potential Consistently Builds Pressure And Mix-Ups
- Burst specialist to close the distance and build pressure via mix-ups
- Rising Vortex via 214 are the only Dragon Punches that can be combo’d without spending meter
- Lack of proper recoveries makes his combos punishable on whiffs
Perhaps the embodiment of “best foot forward” in Dragon Ball FighterZ, Super Saiyan Blue Gogeta excels in straightforward offense – bursting through combos is his way to go. Compared to his other fusions, almost all his moves can lead into a combo, making him one of the best rushdown units in the game. When used properly, he can skip neutral and go straight to command grabs, overheads, and a wide range of combos – some of which can KO foes in two hits or even at full health.
Unfortunately, Super Saiyan Blue Gogeta does suffer from being too aggressive. All it takes is a whiff for players to end up with the short end of the stick, which means execution is paramount. Get a combo wrong, and Gogeta may never get the momentum back. On top of that, his lack of defensive options, which doesn’t always bode well against other heavy-hitters.
Use meter to finish combos instead of the actual ender, as they are punishable on whiff and very difficult to recover from. Likewise, avoid using long-ranged normals willy-nilly. Control neutral until the opponent gives way for an opening.
8
Adult Gohan
Grow In Power As The Fight Continues
- Potential Unleashed Super improves Adult Gohan over time with new moves (alongside a second airdash, Reverse Beat, special cancels), making him stronger across the match.
- Unique Assists are perfect for neutral, blockstrings, and pressure
- Potential Unleashed is heavy on risk-reward, as Adult Gohan is forced to dump Supers into this if he wants to unlock more moves
Ask any Dragon Ball fan if there’s a character with wasted potential, and that’s Adult Gohan. Thankfully, Gohan does come with one of the most unique mechanics in Dragon Ball FighterZ gameplay – Potential Unleashed. At its core, this lets Adult Gohan progress across “Levels” throughout the match – with Level 7 being his most potent. This mechanic (achieved via Super) is directly tied to his core gameplay loop: combo potential with reverse beat, blockstrings, reversals, and impressive stagger.
However, Adult Gohan’s nigh-limitless potential does have some flaws – he has to meter dump into an underwhelming Super (Potential Unleashed via 236L+M/H+S) just to enjoy each Level’s benefits, meaning many aspects of his kit are locked at the start of each match. As such, players need to prolong the match if they have optimal Adult Gohan setups, or master iterations of the character based on the movesets they unlocked.
Memorize which new moves get unlocked per “Level” to know which combos and counters are accessible at any given moment. Adult Gohan has strong pressure potential, so use his blockstring and stagger moves frequently.
7
Frieza
Projectiles Dominate Range With A Golden Crutch
- Projectile game easily dominates range
- Golden Frieza is a crutch for anti-blockstun with damage buff, double airdash, and reverse beat.
- Lack of any “hard” specializations – Adult Gohan is better at installs, Broly is better at zoning, and Blue Goku, Vegeta, and Gogeta are better at pressure.
Being an intergalactic tyrant, it’s no surprise that Frieza is a villain of many talents, and his Dragon Ball FighterZ kit is no exception. Unlike other characters, Frieza doesn’t lean into any specialized role as his kit can turn him into a rushdown, a zoner, or an install when needed. True to his classic moveset, Frieza excels in dominating range with Death Beam and other projectile attacks, and his EX Death Slash (236L/M/H) is a cheap but powerful defensive move to keep enemies at bay. When up close, Frieza has a plethora of moves to apply pressure, then get away to reclaim zone domination.

Dragon Ball Super: 6 Non-Gods Stronger Than Goku & Vegeta, Ranked
Goku and Vegeta need God Ki just to keep up with the strongest mortals in Dragon Ball. Broly and Frieza don’t need God forms to beat them.
Plus, when push comes to shove, Frieza can transform into Golden Frieza (once a match, 214H+S) and get even more perks like a damage buff, double airdash, and a much-needed reverse beat. Sadly, being a tyrant is cliché, and so is Frieza’s toolkit: he’s easily bested by anyone with an anti-air kit or a simple grapple. Not to mention, his reverse beat is only accessible via Golden Frieza, forcing him to stick to traditional combos for the most part.
Memorize his unique pressure moves (2M, 22S), his anti-superdash (j.S), as well as zoning tools that cover the ground (236S, 236L/M/H, 5S) and air (1S/2S/3S). These help Frieza gain pressure as soon as they get the opening for a rushdown
6
Krillin
Senzu Healing Can Dominate Survivability
- Senzu Bean for healing gives an immense survivability advantage
- Stone Throw and Solar Flare are decent okizeme tools to sustain pressure
- Lack of anti-air power, on top of high-recovery projectiles, makes him very fragile in certain situations
Make no mistake, Krillin might remain a candidate for World’s Best Sidekick, but his Dragon Ball FighterZ kit can make him into a standout in the right hands. Similar to Frieza, Krillin can zone with an assortment of ki blasts and apply pressure with his specials, and get into unique mix-ups with his incredibly fast normals. Where he trumps Frieza is his support kit: Krillin can use Senzu Beans (214L/M/H) to constantly heal himself or his allies, while his okizeme tools (Stone Throw, 22L/M/H, and Solar Flare, 214S) make him irritating to fight.
What makes players prefer Krillin as more of a support unit than a main unit is his rather limited physicality. Being shorter than most characters, Krillin’s speed suffers from weak distance and has barely usable anti-airs. Not only that, his projectiles can’t apply enough pressure, which means Krillin needs to get a bit closer to seal in damage – and if he misses his mark, the counter will be harsh.
Skip lights and heavies and master mediums instead, as his 5M can punish whiffs and dominate neutral. To make up for his shorter attacks, his Ki Blasts are very maneuverable and have different effects per direction, making them perfect for his mix-ups.
5
Android 17
Drive Moves Give Serious Mix-Up Potential
- Drive Moves give him tremendous mix-up and pressure potential
- Air Fake Out (j.214) and Acrobatic Assault (236S, 214S, 6S, 4S) help him escape cornering
- Lack of range forces Android 17 to become more aggressive than necessary
Building off the lore that he can tap into an infinite source of power (insanely fast meter), it doesn’t take a lot for Android 17 to start handing out punishment. It’s easy to use his Accel Driver (236L/M/H) and Finishing Driver (214L/M/H) to branch out and cancel into a wide variety of moves, giving Android 17 immense combo potential. Android 17 even has one of the best assists in the game – his Assist A is a barrier that protects him and opens up to a nifty blast. Combine these with his incredible air mobility to escape sticky situations, and it’s no surprise Android 17 is perhaps the best beginner character to pick up.
However, Android 17 players do need to remember which moves go with what when doing any of his Drivers. Not only that, but his lack of effective range means Android 17 needs to be in the enemy player’s territory all the time. Missing out on either means Android 17 can’t maximize his speed, severely limiting his potential.
Since his normals have poor range, opponents must get in at the right moment before swooping in with Drivers. Use Reverse Gear to counter reversal supers and guard cancels, especially as opponents hit low health.
New Questions Added!
GameRant Quiz
Easy (15s)Medium (10s)Hard (5s)Permadeath (5s)
4
Beerus
- Spheres of Destruction (2S, 236) return to the screen and bounce around, giving him a layer of unpredictability.
- Kit built for easy mixing and pressure.
- Moves normally have a short range, making it difficult to break opponent pressure.
Being a literal God of Destruction, it’s no surprise Beerus has one of the best meter gains in the game – embodying his easy access to his best moves. Beerus comes with a unique gimmick called Spheres of Destruction (2S or 236L/M/H/S) – essentially projectiles that explode on contact with the enemy that Beerus can also knock around the battlefield. By the time his Spheres enter the battlefield, Beerus becomes quite the unpredictable juggernaut.

6 Modern Anime That Do Powerscaling Better Than Dragon Ball
Though Dragon Ball is one of the most memorable anime of all time, these modern anime series handle powerscaling much better.
When players combine Spheres with his mix-up potential and pressuring kit, Beerus becomes challenging to even approach. With his God of Destruction’s Wrath (214S) being a meterless reversal, Beerus can escape pressure easily. However, Beerus does suffer from a lack of effective range and lackluster neutral, demanding the God of Destruction to get up close – sometimes more than necessary – just to get his attacks in.
If an orb collides with Beerus during a combo, just special cancel it on impact to preserve combo momentum. With 236[X] and 2S being -2, Beerus can finish a blockstring with a safe backdash to set up a punish on whiff
3
Super Saiyan Blue Vegito
Get Neutral Control With Good Screen Clears
- Neutral control achieved via longer-ranged normals and screen-clearing moves
- Reverse beat can lead to more combos, therefore better pressure
- Loses his left-and-right mixups at the corner, limiting his pressure potential
Ever the arrogant showman, Super Saiyan Blue Vegito in Dragon Ball FighterZ can control the tempo of the match by baiting his foes into his immediate vicinity. By then, he’ll apply pressure through blockstrings and longer-than-usual neutrals that don’t leave opponents with a lot of openings. Vegito can regain over neutral with wide-enough attacks like his Split Finger Shot (236S) and Spiral Heel Shot (236L/M/H) or even an anti-air Atomic Buster (214L/M/H) grab that can stop any counter-assaults. As one of the few characters (alongside Frieza and Gohan) to have reverse beat, Vegito packs some serious combo potential.
However, being the game’s King of Neutral does mean Super Saiyan Blue Vegito only excels for as long as he stays in control. Vegito loses steam if he corners his opponent, as that means their defense is decent enough to actually sustain his assaults. Not to mention, his weak lights can leave him quite vulnerable if he whiffs, and he doesn’t have good enough defense for guaranteed recoveries.
Vegito has extremely strong staggers: his 5LL and 5L are -5, making them great tie-ups to a 5H > 5S string to maintain and re-establish pressure. Both moves can even whiff-punish shorter 6f 5Ls or 2Ls, then alternate to a DR or 6M on block.
2
Trunks
- Cyclone Jump/EX Flip grants awesome mobility and screen coverage
- Meter-heavy and lacks safe-on-block moves, leaving him dependent on controlling the flow of the fight
Trunks bringing a sword to a fistfight is just the start of his screen dominance in Dragon Ball FighterZ. Aside from his sword giving him natural range, Trunks has stellar screen coverage with some of the game’s best mobility via the infamous “EX Flip” (Cyclone Buster, 214H) and wide-reaching attacks like 5S and Change the Future (214S). These alone ensure Trunks can get in and out of encounters quickly, all the while possessing other notable moves like a command grab with full invulnerability (Heat Dome Attack, 214L+M), instant overhead (Shining Slash 236H), and corner-viable mix-ups.
However, using Trunks effectively requires a lot of meter investment. This risk is compounded by the fact that few of his moves are safe-on-block, whereas a lot of them have high recovery. On top of blocks being inaccessible during EX flips, Trunks becomes a character that demands a lot of meter-to-movement management before ever rewarding players in the match.
Don’t press the button too hard when doing EX Flips – just tap the desired direction, then understand the timing when doing it after assists, blocks, or blockstuns. When doing mix-ups, remember that most of the time Trunks can likely still do EX Flip as well as other movement-viable options like Empty Vanish, Shining Flash, and tick throws, among others.
1
Super Baby 2
Dominate Range And Steal Assists
- Ki Blasts easily dominate range and meter gain, giving him access to a lot of moves quickly.
- Projectiles leave him open to punishments via a well-timed Super Dash
- Needs to memorize how to best use each character’s Assist in line with his own moves
Super Baby 2 possesses such a strong zoning game that it’s difficult to even get close to posing a threat. Unlike most combatants, Super Baby 2 falls back on his wide assortment of Ki Blasts to dominate the battlefield. Whether it’s his three-shot (5S), downward-diagonal shot (j.S), up-shot neutral (2S), or his big straight-shot (Reverse Shot, 6S), these projectiles actually return from the other side of the battlefield in a myriad of angles to confuse the opponent. Naturally, this comes with incredible meter gain – assuming he knows which projectiles to rotate based on the flow of battle. Given how the wrong step can leave players open for a one-touch KO, Baby’s distance game is a much-needed advantage.
The scariest part of Super Baby 2’s kit is his Parasite Takeover (22L/M/H), letting him use the opponent’s recently-KO’d member as an Assist with just a startup animation cost. However, this unique kit does have a high skill ceiling and opening for punishment: get reckless with projectiles, and opponents might just find the opening to counter with a Super Dash. Assist steals are only ever effective if he knows the best way to use them in the fight, which means failure to memorize his ideal combos leaves him without the meter gain he needs for a persistent assault.
Know which assists are worth stealing – Dragon Punch C, a Tracking C-Assist, and Projectile Assists are always good options to help Baby build his pressure game.

- Released
-
January 26, 2018
- ESRB
-
T for Teen: Cartoon Violence, Mild Language, Mild Suggestive Themes
